
There are many different ways we can depict Contrast in Painting, and because of this, this lesson will need to be split into different parts so we can go into each different type of contrast in depth. But first let's get into exactly what contrast means.
The dictionary definition is as follows:
Contrast: The state of being strikingly different from something else, typically something in
juxtaposition or close association.
Synonyms: opposition - antithesis - opposite - contradistinctionSo I think we all have a pretty good feel of what something is when it is in contrast with an opposing element. But how does this relate to painting and color? In what different ways can we show contrast simply by using different colors? Take a pad and paper and write down all the different ways we could create contrast with colors. You might not know the exact terms for them, but you'll still be able to figure out some common ways this is done. When you're finished writing your list you can continue with the lesson where I will go through all the different types of contrast.
Assignment: Write down all the different ways we can create or experience contrasts of color.
-----------------------------------------------------------------------------------------------
All done writing? Good. Now we can flip to the back of the book and see the right answers. Don't feel bad if you only came up with three or four different types of contrast. These things are rarely taught at the college level let alone primary school art education classes. It boggles my mind as to why; however, it is one of the most concrete foundations of painting which you will ever learn.
You may be asking "why is contrast so important?" and the answer is simple. Our eyes love contrast and it is how we make sense of the world. If you want to highlight a certain area of a painting then this is the area which should have the highest amount of contrast. Our eyes are naturally drawn to these areas, and it is easy information for our brains to process. When making a two dimensional representation of the three dimensional world we need to take advantage of how we see, in order to translate this to a believable painting.
Let's start with Contrast of Hue and what exactly this means.
Contrast of Hue:
This is the simplest of the different types of contrast that painters often use. You should remember that the term Hue just means a color which has not been diluted in any way. It is color in its "purest" form. When we put multiple different colors up against each other we will see a very strong contrast between them. For starters lets look at this painting by Ellsworth Kelley which is a simple illustration of the strength of contrast of hue. He uses the three primary colors in their purest form and paints each individually.

All three of these primary colors are in strict opposition to each other. So much so that there doesn't seem to be any relation to them at all. Each color stands alone as if it were its own entity altogether. This is what I mean by contrast of hue. So how can we take this out of the square minimalistic boxes and start applying it to more complex compositions? I believe the next painting by Mondrian takes a step in that direction and we can see that not only can we work with these elements as if they stood on their own, but we can also integrate them into a larger composition.

And now let's take this idea a step further and apply to a composition which has some figural elements as well. In the following painting by Matisse we can see that he used only contrasts in hues, and black and white to create an entire composition that includes both a figure in an environment, but also a small landscape in the window. There are a few other types of contrast occurring in this painting but we'll get to those later.

When dealing with only Contrast of Hue we can see that many of the paintings take on a youthful or even joyous feeling to them. Which is one reason why many of the Fauvists decided to use these colors to enhance the meaning of their exuberant paintings. But these types of examples of Contrast of Hue aren't only from the 20th century. Painters have used this rule of painting for hundreds of years to create an atmosphere of intensity. One can look at Raphael's Adoration of the Magi for an older example of how Contrast of Hue was utilized hundreds of years ago.

Assignment: So I hope I've given you a good indication of what Contrast of Hue means. For the following assignments you will be working with only Hues (undiluted). I want you to paint a 12 square checkerboard of all these different colors plus white and black (Mondrian is a good example of how to approach this). After that you will be working on an abstract painting which uses the same palette which was used in the checkerboard assignment. Be careful to keep every color as pure as possible (Don't mix your colors! Use them straight out of the tube). We'll get into differences in value and other color theory in subsequent assignments. If you need more help look at the example below which was done by a student working on the same assignment.

-------------------------------------------------------------------------------------------------------------------------------
Contrast of Value:
This is another rule of color theory which is fairly easy to grasp but which is often ignored. When speaking of the contrast of value we are talking about the lightness vs the darkness of certain colors. The easiest way to illustrate this is to first deal with only black and white as it is the easiest way to see a difference in value. In the video below by EmptyEasel we see a very clear representation of how we can use simple dark and light contrasts to create certain effects which create a more believable depiction of the 3d world on a 2d surface.
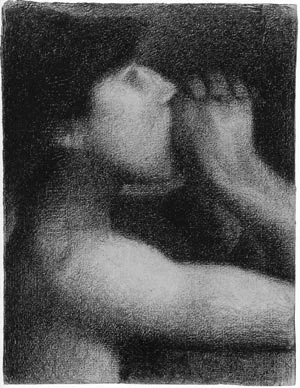
In the following drawing by Seurat we can see how a contrast in value achieves similar effects as the video outlined above. Notice how each edge has a sharp contrast in value against the other edges. This pushes certain elements back in space and allows for other elements to come to the forefront. It should be noted however, as stated in the video above, that it isn't bad to sometimes have your values "bleed" into each other as this causes a composition to have linkages which give it an overall feeling of unity.
Now lets look at another example but this time working with color and the different values that colors have as well. In the following painting by Rembrandt look at how he effectively uses Contrast of Value to bring our eye right to the most important feature of the painting.

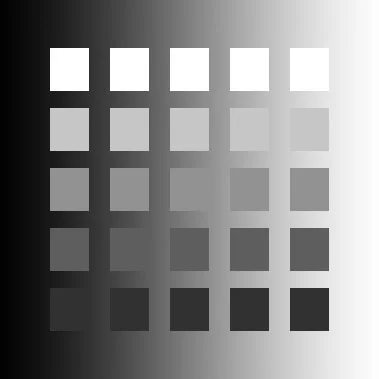
Assignment: First start out by mixing a 5 step value scale in black and white acrylic paint. Once you have all of your colors mixed you will be creating a grid based solely on these five different values. The first thing I want you to do is create a graduated blend from dark to light going diagonally across your canvas. Once this is dry, use your 5 different values which you have mixed to create strips of squares going across the canvas. An example of this can be seen below. Notice how the surrounding value completely changes the way we perceive the value in the square. Even though the values are the same across the entire strip of squares they appear to be of different lightness/darknesses in the end.
Extra Credit: Do the same exercise by first mixing a value scale of a certain color, and then finish the assignment with that color as opposed to black and white.
----------------------------------------------------------------------------------------------------------------------------------
Cold Warm Contrast:
In this type of contrast we are looking at the perceived temperature of a color. These should be pretty straightforward to everyone. In class when I ask about which colors are warm and which colors are cool I'll generally get the following responses.
Red- Hot
Orange- Warm
Yellow- Warm
Green - Cool
Blue - Cold
Violet - Cool
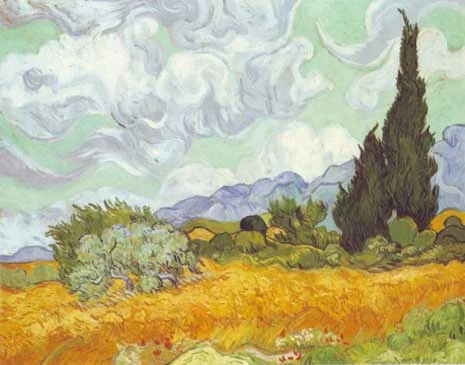
So how can we use these differences in perceived temperature to our advantage? Well, the easiest way to begin to depict the differences in Cool/Warm Contrast can be seen in many landscape paintings. When one looks at a landscape we will notice that things in the far distance take on more of a cool bluish tone (this was first observed by Da Vinci who named this phenomena Atmospheric Perspective). So it is fair to say that cooler colors tend to recede into the distance, while warmer colors want to push to the front in space. In this painting by Corot we can see this in action. Notice how the cool colors near the horizon recede into the distance while the warm orange tones of the ground naturally seem closer to us. The same can also be seen in the Van Gogh painting as well.

But once again, this rule not only can apply to landscape paintings to achieve a sense of depth. It can also be used in figurative works much in the same way as Contrast of Value to direct the viewers eye to certain places. In the image below by Odd Nerdrum we can see how Contrast of Warm and Cool colors makes the figures stand out against their background, but also if we look really closely at the flesh we can also see a lot of warm vs cold happening in shadows vs light areas of value as well.

Assignment: Mix up six different colors both of which are examining the ideas of cold and warm colors. For instance Orange, Red, and Yellow for warm, and Green, Blue, and Violet for Cool. Then create an inverted city landscape where the cool colors are in the foreground, and the warm colors are in the background. This will create an immediate sense of tension (something we convered in Gestalt Principles of Design) and create an interesting dynamic. If this sounds too hard for you to grasp you can take a look at how a third grader interpreted this assignment. If a third grader can do it, so can you.

----------------------------------------------------------------------------------------------------------------------
Complimentary Contrast:
In this case we are looking at how complimentary colors (colors opposite one another on the color wheel) activate elements in a composition and create a contrast. If you recall during the Color Wheel for Painting lesson we extensively went into exactly what complimentary colors are and how they work. Complimentary contrast is often also used to create a sense of contrast and highlight certain objects. It is also many times used to give a painting an overall feeling of harmony as our eyes naturally see the compliment to every color which we perceive (see Properties of Color for further reference).

In the painting above by Monet we see how complimentary contrast can bring life to a painting and can be used effectively to convey harmony across the entire composition.
Notice the interplay between all the complimentary colors in this painting. The blues happily reside right next to the oranges, and the shadows are filled with both violets as well as yellows. But it is important to note that there are numerous shades of each color, and that much experimentation had to be done to get the colors to harmonize. When working with complimentary contrast it is important to understand that one must also manipulate the value of a color when laid beside another in order for the painting to be read correctly. Simply put, this means that the painting should still work as a drawing if a black and white photo were taken of it.

Assignment:Using some source material (either a photo or a sketch) make a portrait painting of a person in which the subject is the complimentary color to the background. Remember as always, the places you want to highlight the most should have the most intense complimentary contrast in the whole composition. You can take a look at this self portrait (after he cut off his ear) by Van Gogh for inspiration.
-----------------------------------------------------------------------------------------------------
Simultaneous Contrast:
Now things start to get a bit trickier as we delve into types of contrast which aren't as clearly defined as the previous ones. Simultaneous contrast identified by Michel Eugène Chevreul refers to the manner in which the colors of two different objects affect each other. The effect is more noticeable when shared between objects of complementary color.
In the image here, the two inner rectangles are exactly the same shade of grey, but the upper one appears to be a lighter grey than the lower one due to the background provided by the outer rectangles.

This is a different concept from contrast, which by itself refers to one object's difference in color and luminance compared to its surroundings or background. Basically it is important to always remember that whatever color surrounds the color you wish to depict will change how we perceive that color. For this reason you'll see that many artist palettes are grey which gives the least amount of interference with the color which is being mixed.

Assignment: Using Simultaneous Contrast create an abstract composition where the same color is used in different places throughout the composition but appears to be a different color when viewed overall. This can be achieived by first working on a large "background" of your painting first, and then painting in small sections of the same color in different selected small sections of the work. You can look at the painting below and examine how the same color has vastly different qualities based upon the colors surrounding it.
-------------------------------------------------------------------------------------------------------------------------------
Contrast of Saturation:
This refers to the contrast present when more than one instance of a saturated color are present. We previously covered saturation and intensity, and by using Contrast by Saturation we can achieve an effect which gives us contrast based solely on the saturation (brightness) of a color. In the image below we can see how different colors change when their saturation is changed. Generally this can be easily achieved by adding more white, black, or a colors compliment to the color which is being mixed.

In the following painting by Matisse we can see how he used different saturations of the same color to achieve contrast. The pipe is the most saturated color in the painting, and also the place where our eye goes first. By doing so he has led our eye in the right direction by using a more intense/saturated color up against less saturated colors.

Assignment: Start with a very saturated color and make it less saturated by adding black in successive amounts, then do the same with white and make five different variations of tints. Then mix it with it's compliment and make five different variations of the color. Using this single color as a base make a painting based upon a sketch or photo while thinking about which area should be the most important (saturated) and which areas should be the least.
--------------------------------------------------------------------------------------------------------------------------
Contrast by Extension:
Think of this as seeing the overall color theme for an entire work first. Looking at the painting by Breugel below we can see that the painting has an overall feeling of being very blue and cold. While the animals as well as the people are contrasted against the larger environment. Essentially you are contrasting a large amount of canvas against a very small portion. In order to achieve this effect you must also use other types of contrast which we have already covered such as Warm/Cool Contrast , Or Complimentary Contrast. The idea being that large areas will effect smaller areas, and if these smaller areas are in high contrast against the larger whole a balance can be achieved and the smaller subjects can be seen as more important.

Assignment: For this assignment you will first create a landscape which has an overall color theme to it (cool colors work best such as green and blue) and then you will create a figure to put into this environment which is out of tune with the larger color theme. You will notice immediately that the figure stands out in a very extreme fashion to the point where it may not seem like it should fit. If this is the case you can lower the intensity of the figure by lowering the saturation of the color.