Week 6: Figure in an interior/exterior

Now, I understand at this point we're about half way through the semester and that many may still not be fully caught up. That's fine, just don't let this class snowball on you, because as you've probably noticed it's actually quite demanding considering we do so many different paintings.  The more you procrastinate, the more of your future you're stealing from yourself! Take a look at this lecture on procrastination which I think is a good way to think about creating art, or making any goal for yourself.

So, for this week we are going to be working on a figure in an interior painting.  You should all come with your image ready.  Remember that these photos should not be posed, they should be candid shots taken when the model is off guard and acting naturally. When you hold up a camera and someone sees it, they immediately change, and this is much more reminiscent of a snapshot rather than a painting. The simple way to get a good photo is take tons of them. Don't worry, just go out one night with your friends, and take some shots when no one is expecting them.  If you're not comfortable taking images of your friends, then go to a public place and try to sneak a few shots of people at a cafe, library, or park.  There's a whole documentary about Vivian Maier who was a nanny who was secretly a street photographer with thousands of photos under her belt. If you're looking for inspiration then check that out.

w6i1.png


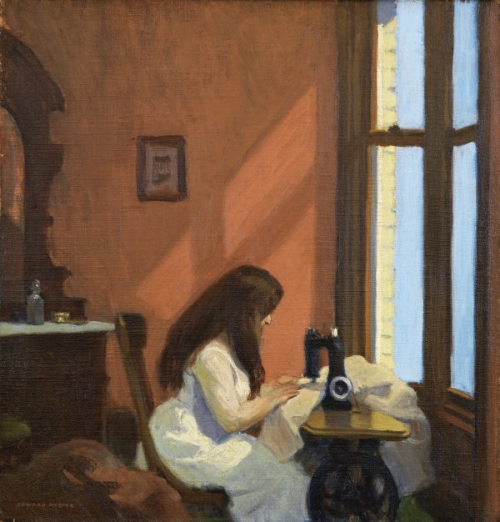
For this assignment I want you to attempt to treat the figure in the exact same way as you do everything else in the room/environment. That means no special attention is givien to it. The figure is simply the same as a vase on a table, or a chair in a corner. The goal of this assignment is to try and almost hide the figure into the jumble of colors in the painting. This can be done be lightening value contrasts, making the focal point another place in the painting, and using less intense colors on the figure as compared to the background. The interior space should be given more importance and attention than the figure itself.

You should've come to class prepared with an image printed out of a figure in an interior/exterior. This is the image from which you will be working. If you want to make sure that the drawing is correct, I suggest using the grid method which will help ensure that the proportions in your drawing are correct before you begin the painting.

You can use a grid to break your composition up into more manageable pieces, and value shapes. Once your grid is finished you can jump into your painting like you always do, which is to block in the dark areas first, color match everything to your photo as you did in the last assignment, and then work lighter as you go.

vuillard.png


sickert.png
bonnard.png


Week 7: Critique

This week we will be meeting individually to look over your progress and ensure you're on the right track.  You should have all of your images from the entire course saved on your phone, or uploaded to your blog. You should also have all the images of your inspirational artists, as well as all of your research, and notes.

Critiquing artwork is kind of a strange exercise in this day and age. Mainly because everyone is coming in with different intentions, different interests, and different skillsets. I think the most important thing during a critique is just to be honest with yourself. Take a look at some of your inspirational artists, and then look at your work. Take note of where they are doing things more effectively, and come to terms with what you need to do in order to get to their level.


Since we have just been working on technical aspects of painting, we will also be critiquing these aspects as well. I'm not going to get too hung up on things like concept or your ability to talk about the work. I just want to see what you're doing, where you want to go, and hear about where you think you're at. These are informal meetings but you should come prepared with all of your images ready to go. Due to the number of students in the class, I can only allot so much time to each person, so it's best used in looking and talking rather than having you stumble around trying to find some image on your phone.

Week 8 : Color Theory

Now that you've got a good grasp of color it's time to dig in a bit deeper and start looking at some theory. If we're talking about color theory there's one person who is often cited as being the most important color theorist in moder history, and that's Joseph Albers. Albers was a teacher who sought to formalize his studies into color into a series of simple exercises that would enable students to see just how complicated color can become.

For this assignment you will be making squares, and observing how color changes based upon what is surrounding that color. This is a very important concept to grasp and is the foundation of color theory. It's often said that if you ask an artist what their favorite color is, they'll reply "it depends on what color is next to it" since these things effect our perception so much.

For the following exercise we will be making four sets of color. Since these things are better shown rather than written about I would ask you to look at the images for further guidace.

  1. 4 colors from 3: to make the same color look different (2 small squares of the same color are placed against backgrounds of very different colors, making it look as though there are 4 colors when in fact there are only 3);

  2. 3 colors from 4: to make 2 colors look the same (2 small squares of different colors are placed against 2 different backgrounds carefully chosen to make the 2 small squares look identical, making it appear as though there are only 3 colors when in fact there are 4);

  3. simultaneous contrasts: to find the one color that is equally close to or equally distant from the 2 large backgrounds of complementary colors.

  4. Vibrating Colors. These are colors that are often compliments and exhibit high intensity. Use lightning bolt type marks to highlight these vibrations.

w81.png


w82.png
w83.png
w84.png


Once finished with this exercise you will take the remainder of the class to begin research on your final major project. Go to the library, talk with me, take notes, collect images, do whatever it is that you need to do to get focused on what it is that you want to create for your final project. You will need to come ready to class next time with an arsenal of images, notes, and research about your artist, their techniques and processes, and concepts .


Week 9: Final Major Project

In this project you will be looking at the work of an established artist (past or present), dissect the materials and techniques that they employ in the creation of their paintings, and emulate these techniques in the creation of your own work.

There are a variety of elements to this assignment which will all be outlined below.

  1. Collect no less than 5 images from the artist of your choice.

w9i1.png

If you have no idea about what you want to paint, then take some time and look at a variety of images and movements ( Google “list artist movements”)


So in this case I’ve chosen to look at the work of Artemisia Gentileschi.


First lets do some preliminary research on her. It doesn’t have to be too in depth but you should identify the broader movements that an artist is a part of and some of their contemporaries. If you have chosen a famous artist, this will obviously be easier than some random person you like on Instagram. If you’re unsure of where your artist fits within art history we can look at the work together and I’ll help you out.

So, by just looking at the first paragraph of Artemisia’s wikipedia page I’ve found out the following.

“Artemisia Gentileschi or Artemisia Lomi (Italian pronunciation: [arteˈmizja dʒentiˈleski]; July 8, 1593 – c. 1656) was an Italian Baroque painter, today considered one of the most accomplished painters in the generation following that of Caravaggio. “

Now lets ask ourselves. What is Baroque painting? And of course google will tell us.

“Baroque art was meant to evoke emotion and passion instead of the calm rationality that had been prized during the Renaissance. Among the greatest painters of the Baroque period are Velázquez, Caravaggio, Rembrandt, Rubens, Poussin, and Vermeer. Caravaggio is an heir of the humanist painting of the High Renaissance.”

So suddenly we see that our artist isn’t just a lone genius struggling in a garret. They’re part of a larger movement that almost always involves a conversation with their contemporaries (besides “Outsider Art” which we love because it truly does stand alone).  So now let’s look at some works from her contemporaries.  For this assignment you must save 5 images depicting other works made during the same time.

Now you’ve got a good amount of images to work with. If you need to find a way to save these images to your phone you can download an image downloader app (sometimes google images can’t be downloaded directly like the good old days).  If you wish, you can compile these images into a PDF (ONLY A PDF… No really, a PDF! Protable Document Format. PDF) and I’ll print them out for you.

Analyzing your images and taking note of technique, materials, and processes.

Ask yourself the following questions.

How is the paint applied? Is it done quickly, or more methodically.

What’s the subject matter in the paintings? Is it a landscape, a figure, a historical painting, an abstract painting, etc. ?

Does the painting involve glazing and layering, or is it all done “alla prima” (all at once, wet in wet)

What did their preliminary sketches look like? This isn’t mandatory since sometimes they can’t be found. But it is a very helpful tool in discerning just how they painted.

w9i3.png


5. What materials and techniques are used in the painting? Were there any special materials that an artist is using to help achieve their goals?

You will have multiple classes to work on these projects. For this reason it is important to begin with some preliminary sketching. These don’t need to be highly modeled and finished works, but should show the major value changes that you’re going to be working with. You must have no less than 5 preliminary sketches. These are best done in brush and ink since you want to see the value changes. If working from a photo, you will be using a grid to make sure your image will fit your canvas properly.

We will all be meeting individually to discuss more in depth the characteristics of each work, so everyone’s path may be a bit different.  For instance, if you wanted to make a photorealistic painting in the style of Marilyn Minter then you’re going to need a very different approach than with Artimesia Genteleschi. Remember that artists create what’s called a “studio practice” and this practice often involves a very methodical approach to the creation of their work. Try to identify and see how all of these steps create a finalized work.

w9i4.png


w9i5.png